Section 1 - Concept
Section 1.1 - Prompt
For this project, we had to create a mobile device that came with a game related to the UN's
sustainability goals 2 and 9. While goal 2 is primarily in reference to ending world hunger
due to man-made conflict and climate change, goal 9 is related to increasing sustainable infrastructure
and innovation. When finding a way to merge these goals into one, primary lesson to teach with our game,
our group decided to explore the food waste side of goal 2, as not only does excessive food waste contribue to
world hunger but it is also caused primarily by non-sustainable infrastructure, on any level of the chain.
While I could not find any research on the common causes of food waste in the UK, I did find that 58% of
food waste happens on a corporate level in the United States, despite the relatively common idea that food waste
is typically the fault of the consumer. Due to this common misconception, I thought focusing on how individuals
could genuinely help would be the best lesson to teach, instead of blaming them for the corporate misdeeds. While
the game does clearly push you towards shoping at the farmer's market, being the sustainable option, it doesn't
punish you for shopping at the corporate supermarket and actually requires it from you early game, showing the player
that while it's best to support sustainable and local buisnesses when you can, you're also not at fault if you can't.
Section 1.2 - Design
We decided relatively early on to lighten the work load by making the shopping into a menuing system, giving the
designer who was helping with the game portion, Amy Sanchez, free reign on the menus as a whole. Meanwhile, I focused
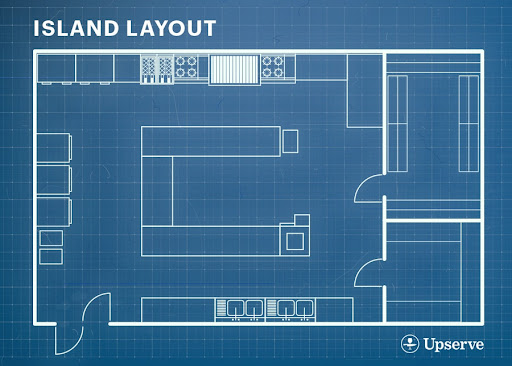
on level design, researching common restaurant kitchens and deciding what was best for the gameplay as a whole. I found
that many kitchens frequently had islands in the middle with a variety of uses, encouraging a cyclical flow to the
kitchen as a whole, as seen below.

I also did research into what appliances would typically be found in an industrial kitchen and their environmental
impact to determine which would be best to include. Certain appliances, like industrial fryers, actually didn't
produce as much waste as I expected, as the frying oil can be reused numerous times so long as there is no cross
contamination or allergy risk. In particular, I found this diagram extremely useful for outlining the typical appliances
in restaurant kitchens.
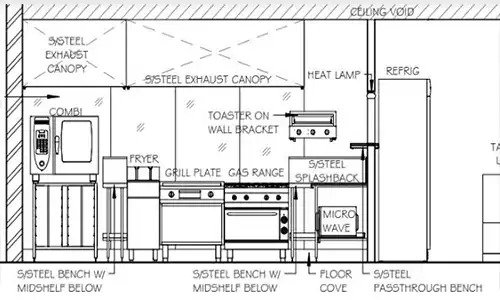
Figure 1.2.3 - Appliance Diagram [Source Unknown]
I also noticed that many kitchen designs included walk in freezers or fridges, and large pantries with incredible
amounts of storage space, however this would allow the player to hoard supplies and that was exactly what we wanted
to discourage with our game, so instead I opted for a smaller fridge/freezer combination along with a single shelving
unit sharing the small pantry space. I also put two large compost bins in the corners of the room, where counter space
would be useless, in order to encourage the player to compost any of the waste they do create in the process. The recycling
bin took up the space next to the pantry in order to encouraging recycling of any of the empty food boxes. The trash can
was designed to be the smallest of the waste bins, discouraging it's use entirely. In addition, the sink takes up the centre
island, allowing for dirty dishes to be put directly in there from the pick-up station and left until you have time to get
to them. In addition, clean dishes go directly into a drying rack on a rolling cart, allowing all of them to be moved very
easily over to the plating station where they will be needed. From a gameplay standpoint, the rolling cart is more than likely
unnecessary, as moving them over would be a simple click of a button, but it felt like a detail that was needed to give the
kitchen a realistic feel, allowing the player to connect to it even more.
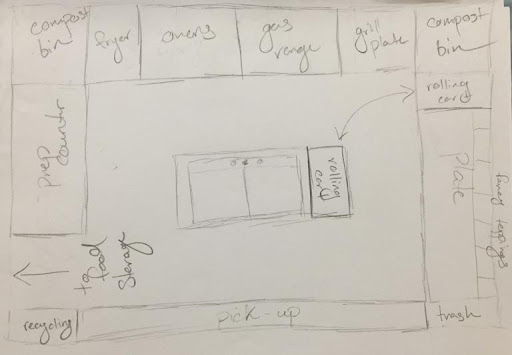
Figure 1.2.4 - The final kitchen design
Section 2 - Creation
Section 2.1 - White Boxing
When it came to creating the kitchen I decided to try my hand at using assets off the Unity store as placeholders,
since my 3D artist, Nathan Kelley, was going to make the appliances as seperate pieces that I could stitch together
into the level design overall. Since I already created the floorplan and was working with an average sized character
in 1st person, I worked significantly less on exact measurements as I did in Switch On and more in what looked and
felt right. Between increased experience and preparation, creating the whitebox took significantly less time than
it had before and gave me the opportunity to move onto the code sooner.

Figure 2.1.1 - The overall whitebox
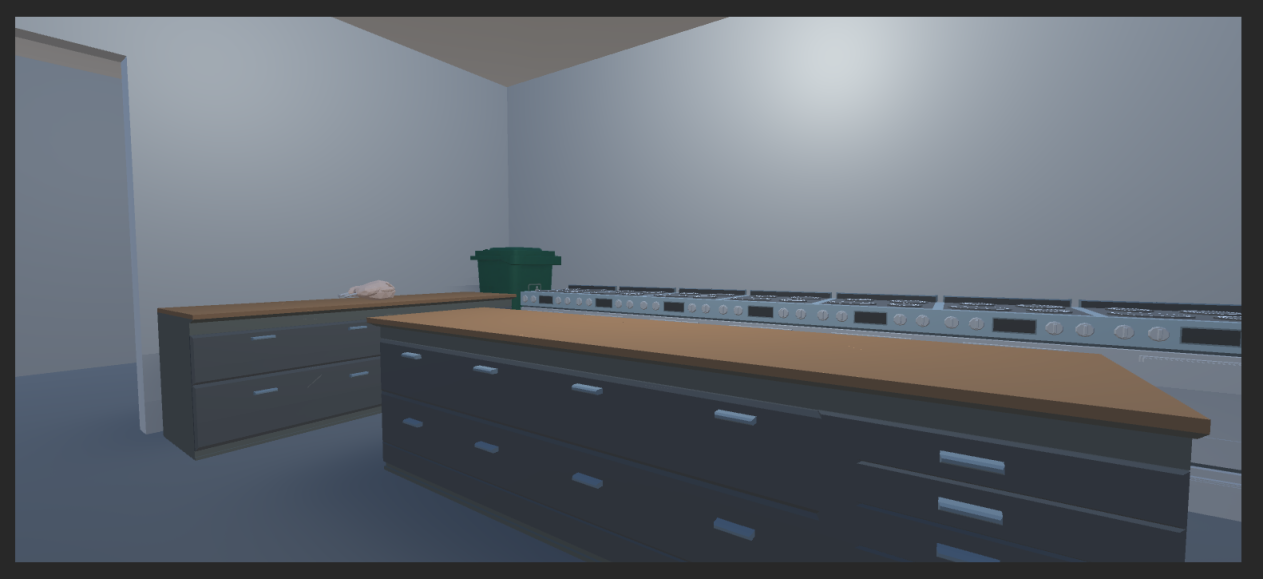
Figure 2.1.2 - Perspective in game
Section 2.2 - Coding
The first step was coding in movement, which I thought would be incredibly easy as I had already done it before
on Switch On. I was very quickly proved very wrong, as no matter what I did, for some reason, part of the character
model would try to move without the rest of it, despite all being child elements under the parent element that held
the movement script. This, of course, meant that the character couldn't move as they were constantly and continuous
colliding with themself which started to hurt my head as if it was a philosphy debate. Eventually I decided to scrap
the code entirely, clearly I was doing something wrong and I decided it was best to try another route in order to keep
the entire project on schedule. I found some very helpful code for 1st person movement that used variables like Gravity
and Velocity that overall sounded much more realistic and worked instantly. After that, I analysed it to better understand
how it worked, and then moved on because there was nothing I particularly needed to change and I felt my time was best
spent elsewhere.
After that, I worked on making the cooking functional. My group and I hadn't talked in depth about how the cooking would
function in particular however we did a bit about creating mini-games for each step. At this point, though, we were
getting close to the final project for the deadline and I was more than a little concerned about having the cooking
in a semi-functional or seemingly functional state by the final presentation. In the end, and due to set backs from the
UI buttons being non-functional, I opted to have the food exist in each state constantly, and only be shown or hidden
depending on what the user was doing. I used boolean functions to determine which stage of the cooking process the user
was at, and box colliders as triggers in order to disallow the player from plating the food from across the kitchen (something
that wouldn't make much sense). For example,
            void OnTriggerEnter(Collider other) {
                GameObject item = other.gameObject;
                if(item.name == "Plating Area"){
                    plateCounter = true;
                }
            }

            void Update() {
                if(plateCounter == true) {
                    if(plating == false){
                        if(Input.GetKeyDown(KeyCode.E)) {
                            foreach(GameObject g in platedFood){
                                g.SetActive(true);
                            }
                            plating = true;
                        }
                    }
                    else if(plating == true) {
                        if(Input.GetKeyDown(KeyCode.E)) {
                            foreach(GameObject g in platedFood){
                                g.SetActive(false);
                            }
                            plating = false;
                        }
                    }
                }
            }
The above code is just a snippet, showing that if the player enters a trigger collider by the name of "Plating Area", then
the boolean plateCounter is now true. Meanwhile, every frame, the game is checking for when plateCounter is true, and once it
is, it checks the status of another boolean function by the name of plating. If the player hasn't started plating yet, it
waits until they hit the interact key, which in this case is the letter E, and then shows the GameObject platedFood. Now, the
player has started plating so the boolean is set to true. After that, if the player stays in the trigger collider or walks away
and walks back, they'll still be able to "pick up" the plated food by hitting the interact key, making the food disappear as if
it is now in their imaginary inventory. Further enforcing the perception that the player is simply carrying the food where they
can't see it on screen is the fact that when you go to put it down in the food pick-up area, it is the exact same plated model.
Figure 2.2.1 - A gif of the cooking loop with the placeholder models
Section 2.3 - Assets
After that, all there was time for was adding in the final models that Nathan got to me just in time the night before the final
presentation. Thankfully, due to my practice with the Unity Store models, putting them in turned out to be very easy and one of
the simplier parts of this project. The only problems I encountered were the fact that some of them were lacking in box colliders
but others weren't, leading me to believe it was an error while we were exporting/importing them. Thankfully, I had also set up the
trigger colliders as seperate entities so when I replaced the models with the final versions, I didn't have to edit or change them
at all.
Figure 2.3.1 - A gif of the cooking loop with the finished models