Switch On is a puzzle-horror game aimed at 11-15 year olds.
The game is designed to teach children the importance of
renewable energy through the medium of problem solving and
story telling. As you progress throughout the game, you
discover the story of what's happening in the world through
background media like emergence broadcasts on the TVs and
radios. The objective is to solve puzzles involving renewable
energy sources such as solar panels, watermills, and wind turbines
in order to light up the world after everything went dark.
Switch On uses a child's fear of something in the dark to
its' advantage, with cartoon shadow monsters adding an incentive
to solve the puzzles.
The first step of creating Switch On was
finding the best idea that fit the prompt
we had to work with. We had to create a
handful of game design concepts for an
instructional computer game aimed at 11-15
year old school children with the intention
to communicate the need for energy
efficiency and sufficiency in relation to
UN's Sustainable Development Goal #7. The
goal states that by 2030, we should ensure
universal access to affordable, reliable
and modern energy services, increase
substantially the share of renewable energy
in the global energy mix, double the global
rate of improvement in energy efficiency,
enhance international cooperation to
facilitate access to clean energy research
and technology, including renewable energy,
energy efficiency and advanced and cleaner
fossil-fuel technology, and promote
investment in energy infrastructure and
clean energy technology, and expand
infrastructure and upgrade technology for
supplying modern and sustainable energy
services for all in developing countries,
in particular least developed countries,
small island developing States, and
land-locked developing countries, in
accordance with their respective programmes
of support.
My team came up with three concept games
for this project, one of which became Switch
On. The other two were a tower defense game
where you retrieved trash from nature and
a survival space game where you have to
collect debris left by other humans in
order to survive and upgrade your ship.
While good game concepts, we felt that
our concept for Switch On fit the brief
better and was overall a more interesting
game to do for the project. In addition to
the prompt, we only had 6 weeks to complete
as much as we could and Switch On felt like
the most do-able concept within that time
frame.
Section 1.2 - Design
The first step of the process was deciding
what our game would look like. After comparing
our idea to similar, successful games, we decided
to make Switch On a 3rd person game with a side-on
camera, similar to many 2D platformers but
modeled in 3D. However, there would only be 2 axis
of motion, the X and Y, giving it the feel of
2D gameplay (which we took to calling 2 and the
other half D). After that, we had to design a level
or levels that were within the scope of the project
and still showed off everything we wanted to show off.
We decided that the main character would be a child
home alone, so it would be easier for our target audience
to project themselves onto the character. As such, the
starting levels would take place in their home before
the character moved on to the outdoors in any future gameplay
we create. Our main designer, Keira Geary, designed 3 character
models for the group to choose from as well as the general
layout of the family home. Basic asset sketches and
logo ideas were created by designers
Amy Sanchez and Tobias Cox respectively and then everything
was compiled together for the pitch presentation.
Section 2 - Creation
Section 2.1 - White Boxing
While the rest of my team went their separate ways with
social media management and box art creation, my first step
was to white box the environment so I could get that sent over
to the 3D artist as soon as possible. Using Keira's layout, I
did research into the average sizes for things like living rooms
and wall heights in order to make the home feel as accurate as possible.
Working with a child character, I wanted to ensure they looked the proper
height compared to their surroundings. As the only measurements in Unity
are undefined units, and I would be the only one seeing that part of the
game, I decided to have 1 unit equate to 1 US foot, as it was easier for me
to understand and work with being an American. I also wanted the house to
look around the same size as it did in Keira's layout, which did lead to a
few objects having bizarre heights (the doorways are only 5'6"), but they
ultimately didn't look out of place in comparison to the surroundings as
well as the character model so I kept them as is. Using exact measurements
also made calculating the coordinates significantly easier so everything lined
up as it should without clipping through each other. One of the final things I
did was create an empty object for each room and make it the parent of all of
the shapes that made up the room, to make it easier to differentiate each of
the objects when inputing future code. I downloaded the white box as a .fbx file
and sent it over to the 3D artist, George Craggs, so he could start to model
the house with measurements and layout in mind.
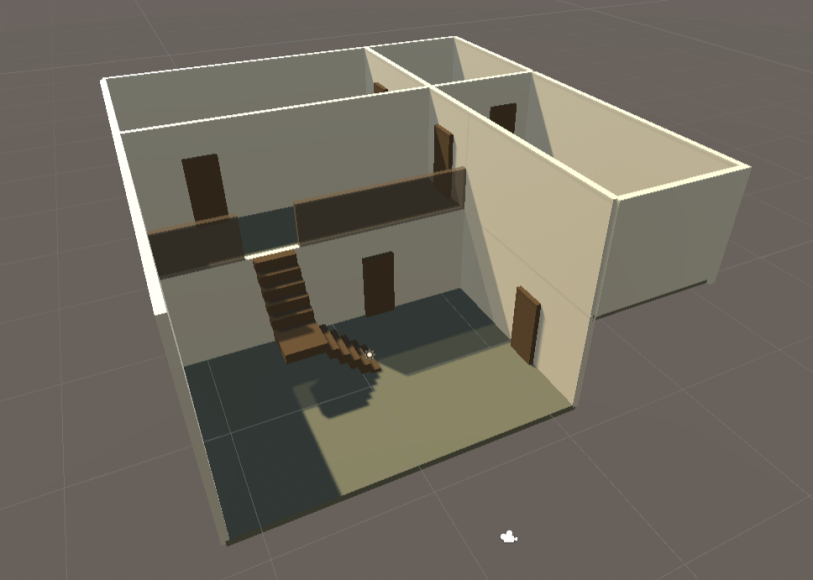
Figure 2.1.1 - The finished white box of the house
Section 2.2 - Coding
After that, my next step was to code movement into the game. I created a rectangular prism
to work as my placeholder character until I could get the 3D model from George and used
that as the base to put any character related code onto. I started with code from an
online tutorial and adjusted it until it not only worked but I understood what each part did.
It took quite a bit of troubleshooting as I vastly underestimated the multiplier that would
be needed in order to make the character actually move but once I realised how high of a
number to input, I was able to test different values around that area to get a proper, child's
walking speed that wouldn't feel too slow but also wouldn't result in the player accidentally
running into a monster. For testing purposes, I included movement on both the X and Z axis but
removed this once it was working as the character was only supposed to have movement on the X axis.
I also coded in a jump function but, at the time, I couldn't get it working as I wanted it to. It
ended up more as a jetpack so I decided, since any platforming would be in levels not within the
scope of the project, to remove it entirely. When working on other functions later, I did learn
a way to get the jump working as intended so while I have yet to add it back in, I do know how to.
After that, I worked on how to not only get the character to move between rooms but also how to ensure the
camera could still see what was happening. From the living room, you can see the walls of the child's bedroom
as well as the parent's bedroom so those walls needed to exist, however they also interfered with the camera's view
when the player is in those rooms. First, I created a bool function for each room to define if you were, or
weren't, in it and used that bool to ensure that you couldn't teleport between non-connected rooms, like the
child's bedroom and the living room. After that, I used that bool function again to say that when the character
was in their bedroom or the parent's bedroom, specific walls/doors would be transformed up 20 units. I put all of
these objects into their own empty parent group so I could just put the code onto the parent and add and remove
children as necessary. Moving the character themself between rooms was a similar function, however instead of
calculating the exact units I needed to move the character (which would've been extremely difficult since I had no
way of telling where the character was before either), I simply transformed them to an empty object within Unity,
each of which were set to be outside the door to the corresponding area.
After that, I attempted to tackle picking up objects, in order to allow the character to pick up the flashlight
at the start of the game. I created a small cube to serve as the object, and like for general movement, I employed
the use of an online tutorial to learn from. While I did get this code working and the object could teleport into
the character's (currently theoretical) hands, it caused some sort of bug with the movement of the character who
would then bounce back and forth between the walls (shown in figure 2.2.1). After a lot of troubleshooting and a
lack of success, I remembered that we had decided the flashlight would be attached to the character, and as the
player would be incapable of dropping it again (as there is no need to), I scrapped this code entirely and went
about creating this in another way. We would already need two character models, one with the flashlight and one
without so I utilized my previous code of transforming the walls in order to swap the models out when the player
picked up the flashlight.
Figure 2.2.1 - The "picking up objects" bug
Section 3 - Future
As of now, everything discussed here is all that has happened from a development stand point with Switch On.
However, while the final presentation has already been given, that does not mean that Switch On is completed,
quite a lot more progress is needed and intended for this to become a playable game. The 3D renders have yet to
be uploaded into Unity and important features like the shadow monsters still need to be implemented. Ideally,
these would've been done by the final presentation however there proved to not be enough time as the previous
steps took much longer than anticipated. I will continue working on this project on the side as I'd love to see
it become a reality. In addition, this page will update with further progress as it is made.
Click here to download the most recent build of Switch On